Where We Left Off
In the previous article, I flashed an ESP32 to connect to Wi-Fi and to an ultrasonic sensor, and read water-level data from it. But where would that data go? I needed a server at home for the ESP32 to publish to — a home lab. In this article, I’ll walk through setting one up with the basic components needed.
Why a Home Lab?
There were multiple reasons — cost of operation and security being the primary drivers. I don’t want to pay for cloud compute, at least in these early stages of my exploration. At the same time, I don’t want to expose automation hooks to my home devices over the cloud. And I can customize the setup as per my needs. Keeping all this in mind, I decided to go for a home lab. I found an old laptop I’d bought back in 2010 that had been sitting unused. It has an Intel Core i5 with 8 gigs of memory. Should be sufficient!
The Plan
The idea is to turn the laptop into a Linux box: switch it on, plug it in, and tuck it out of the way. The Linux installation had to be minimal — I didn’t want to weigh the laptop down with anything unnecessary. No user interface, no unnecessary packages. I’ll call the laptop the server from now on.
Here’s what the server needed to run:
| Component | Role | Runs as |
|---|---|---|
| Debian server | Always-on host | Bare metal, headless |
| Docker + Compose | Runs every service in the stack | systemd service |
| Home Assistant | Dashboards, automations | Container |
| ESPHome dashboard | Compile and flash ESP32 firmware | Container |
Home Assistant is an open-source home automation platform that got recommended to me by a colleague. It is the brain of the setup. It discovers devices on the local network, shows their current state and history on dashboards, and lets you build automations on top of them, such as sending a notification when the tank level drops too low. Devices flashed with ESPHome show up in it automatically, which is very helpful.
The ESPHome dashboard is a web UI for managing ESPHome devices. It is what we used from the command line in Part 1, now running on the server. From the browser you can edit a device’s YAML configuration, compile the firmware, flash it over USB the first time and over Wi-Fi after that, and watch live logs from the device. Although, at least so far, I’ve mostly used the command line to reflash the ESP32 rather than the dashboard itself.
Architecture
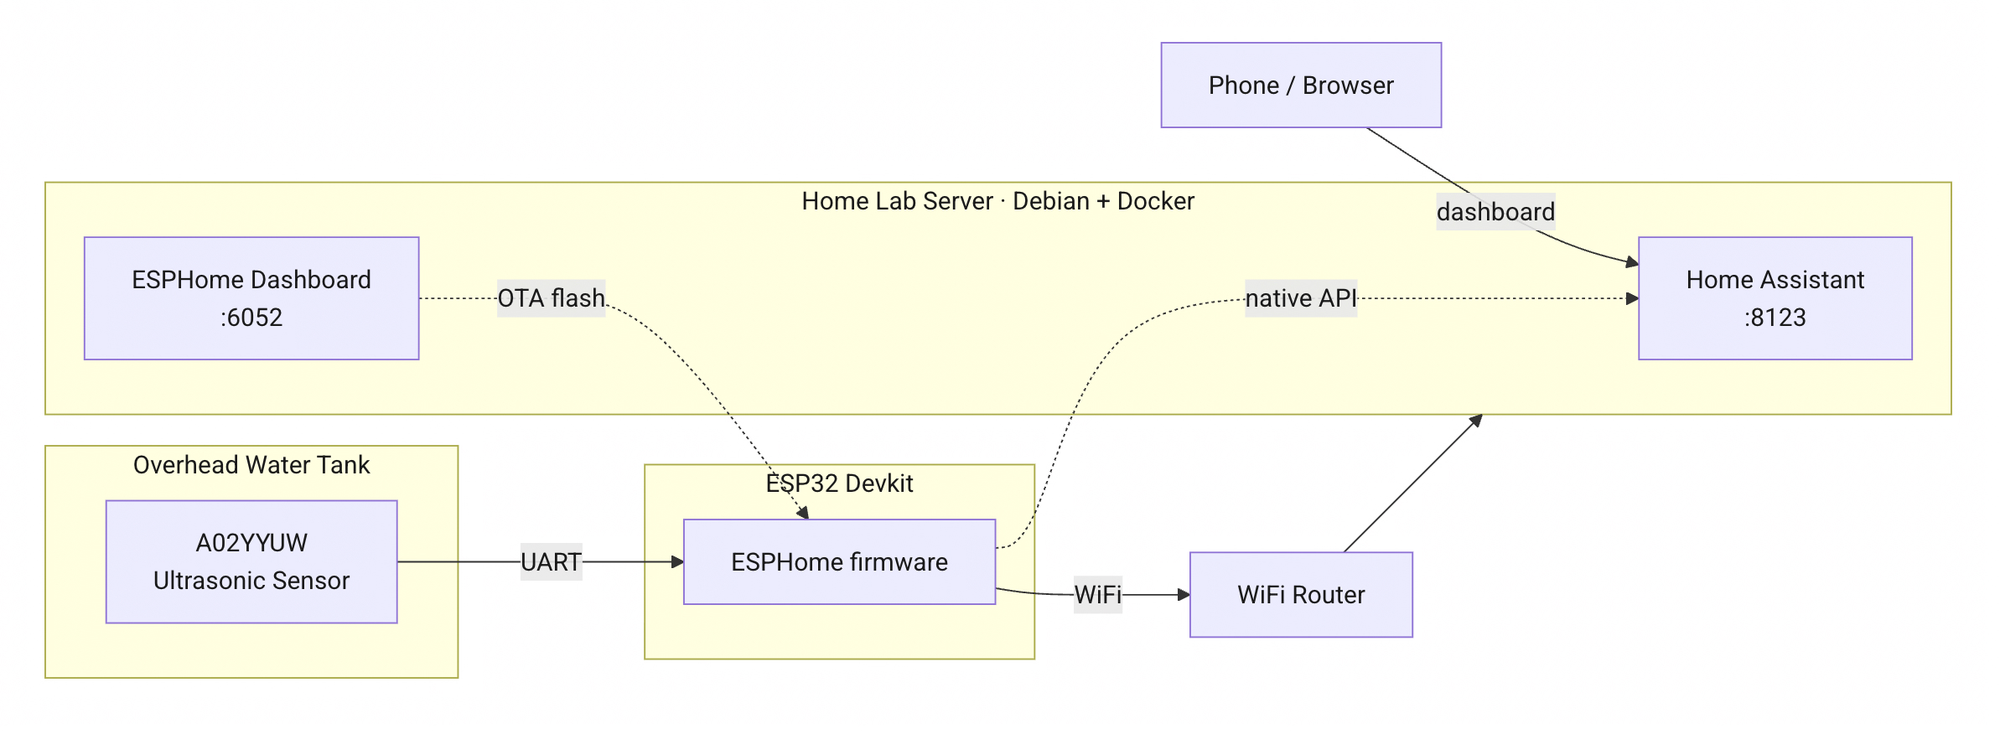
This is how the setup is going to play out.
flowchart LR
    subgraph Tank["Overhead Water Tank"]
        Sensor["A02YYUW\nUltrasonic Sensor"]
    end

    subgraph Device["ESP32 Devkit"]
        FW["ESPHome firmware"]
    end

    subgraph Server["Home Lab Server · Debian + Docker"]
        HA["Home Assistant\n:8123"]
        ESPD["ESPHome Dashboard\n:6052"]
    end

    Router["WiFi Router"]
    Phone["Phone / Browser"]

    Phone -->|"dashboard"| HA
    Sensor -->|"UART"| FW
    FW -->|"WiFi"| Router
    Router --> Server
    FW -.->|"native API"| HA
    ESPD -.->|"OTA flash"| FW
The Server
I started by installing a Linux distribution on the laptop.
Installing Debian
I erased the entire disk as I was not using the laptop for anything else. The ISO for installing Debian over the network can be found here. I made a minimal installation.
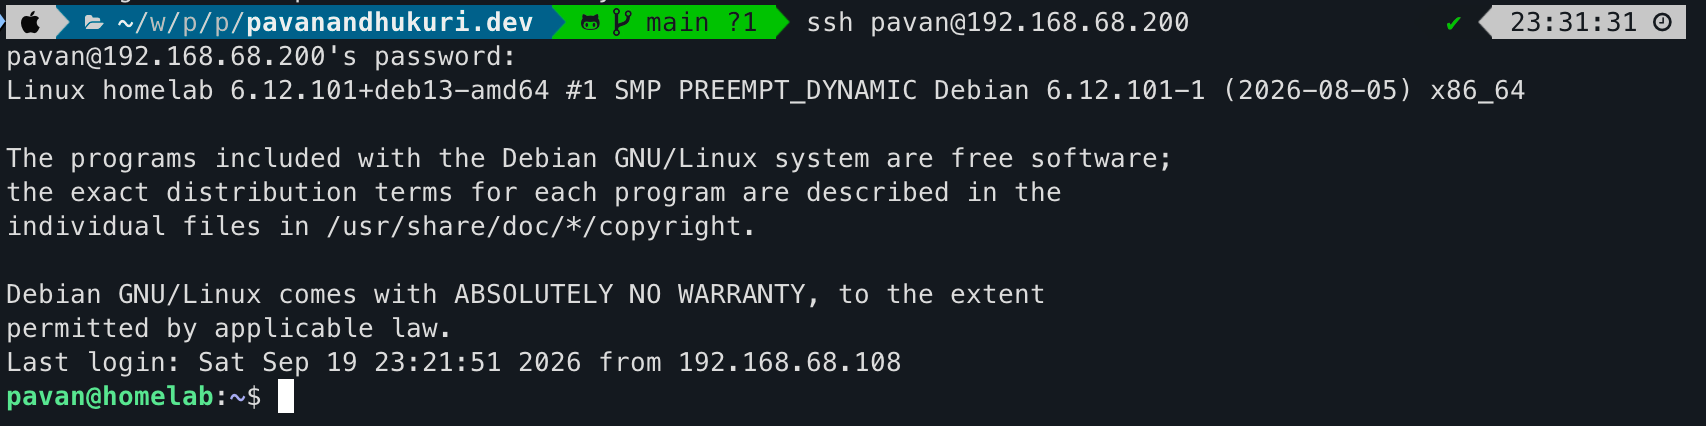 Once installed, I SSH'd into the server to confirm I could connect to it from my development machine.
One small tweak is needed to make sure the laptop does not go to sleep or power off when the lid is closed. This can be done by modifying the following settings in /etc/systemd/logind.conf:
HandleLidSwitch=ignore
HandleLidSwitchExternalPower=ignore
HandleLidSwitchDocked=ignore
Assigning a Static IP
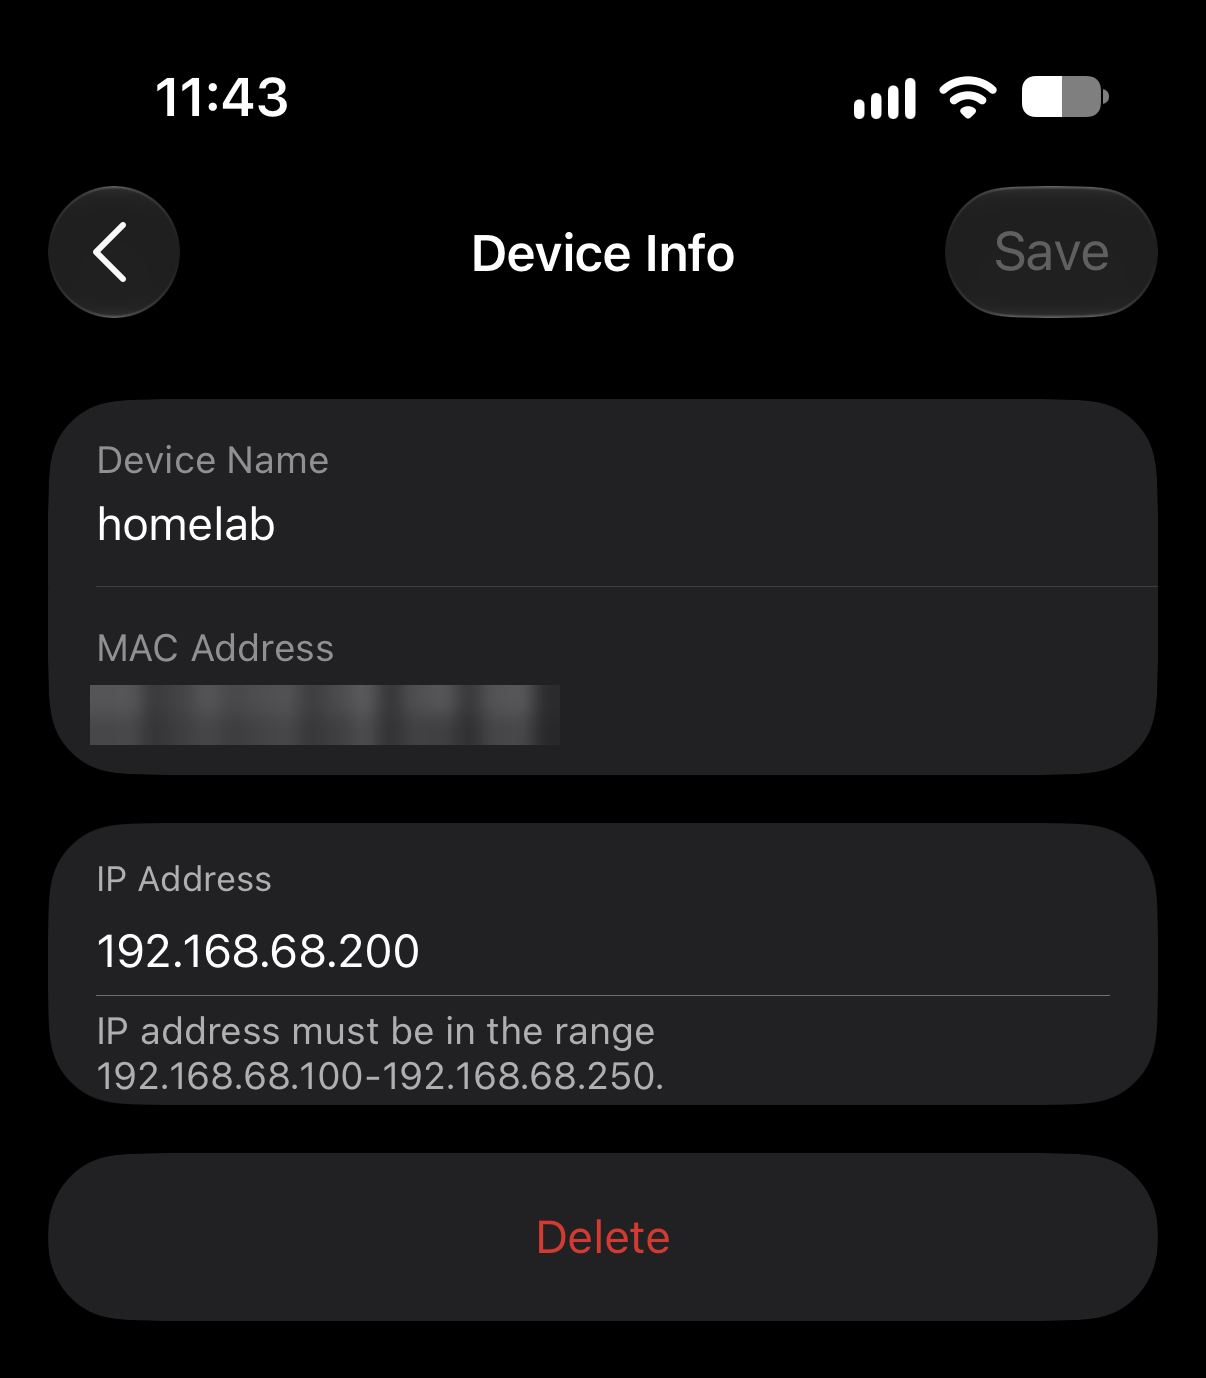 This is important. Generally, devices connected to a Wi-Fi router through DHCP get an IP address only for a certain lease period. Once the lease expires, the IP address changes. I can't afford that, as I need multiple devices connecting to the tools installed in the home lab. Most modern routers allow a static IP address to be assigned to a device based on its MAC address. It's better to do this from the router's end rather than trying to assign a static IP address within the laptop itself. With this, I now have a Linux server running at a static IP address. I can leave the laptop switched on and out of the way while I install the rest remotely.
Installing Docker
I wrapped the Docker installation in a small script, install-docker.sh, so I could repeat it on any fresh Linux box. I made it idempotent, so it is safe to re-run. I copied the bootstrap script to the server and ran it from my development machine:
scp scripts/install-docker.sh <user>@<server-ip>:~/
ssh <user>@<server-ip> 'bash ~/install-docker.sh'
Here is what it does, step by step.
Setup. Fail on the first error, define two small logging helpers, and work out which user should get Docker access:
#!/usr/bin/env bash
set -euo pipefail

log()  { printf '\033[1;32m==>\033[0m %s\n' "$1"; }
warn() { printf '\033[1;33m!!\033[0m %s\n' "$1"; }

if [[ $EUID -eq 0 ]]; then
  warn "Running as root. That's fine for install, but the docker group step"
  warn "below is for a regular user — re-run as that user if this isn't it."
fi

TARGET_USER="${SUDO_USER:-$USER}"
Step 1: Install Docker. Skipped if it is already there. Otherwise Docker’s official convenience script detects the distro and installs the engine and the Compose plugin:
if command -v docker &>/dev/null; then
  log "Docker already installed ($(docker --version)) — skipping install."
else
  log "Installing Docker via get.docker.com ..."
  curl -fsSL https://get.docker.com | sh
fi
Step 2: Run Docker without sudo. This is why a log out and back in (or newgrp docker) is needed afterwards, as group membership is only picked up by new sessions:
if id -nG "$TARGET_USER" | grep -qw docker; then
  log "$TARGET_USER is already in the docker group."
else
  log "Adding $TARGET_USER to the docker group ..."
  sudo usermod -aG docker "$TARGET_USER"
  warn "Log out/in (or run 'newgrp docker') for this to take effect."
fi
Step 3: Start Docker on boot.
log "Enabling and starting the docker service ..."
sudo systemctl enable --now docker
Step 4: Verify. Print the versions and warn if the Compose plugin is missing:
log "Docker version: $(docker --version)"
if docker compose version &>/dev/null; then
  log "Compose plugin: $(docker compose version)"
else
  warn "docker compose plugin not found — get.docker.com should have installed"
  warn "it. Check manually: sudo apt install docker-compose-plugin (Debian/Ubuntu)"
fi
After logging back in, the same check by hand:
docker --version
docker compose version
The Docker Compose Stack
Next up was deploying the actual core components of the setup — Home Assistant and ESPHome — using Docker Compose. My docker-compose.yml looked something like this. It has the necessary volume mounts, and most importantly, network_mode: host, so the containers share the host’s network directly instead of Docker’s isolated bridge network — needed for mDNS discovery on the LAN.
services:
  homeassistant:
    image: ghcr.io/home-assistant/home-assistant:stable
    container_name: homeassistant
    restart: unless-stopped
    privileged: true
    network_mode: host   # simplest for mDNS/device discovery on the LAN
    volumes:
      - ./homeassistant/config:/config
      - /etc/localtime:/etc/localtime:ro

  esphome:
    image: ghcr.io/esphome/esphome
    container_name: esphome
    restart: unless-stopped
    network_mode: host   # needed for OTA discovery of devices on the LAN
    volumes:
      - ./esphome:/config
      - /etc/localtime:/etc/localtime:ro
Once the stack is up and running, these two services are reachable at their default ports:
| Service | Network mode | Port |
|---|---|---|
| Home Assistant | host | 8123 |
| ESPHome dashboard | host | 6052 |
Secrets Management
One important part is how secrets are managed. If you refer back to the previous article, you would see placeholders for the Wi-Fi SSID and password. I was going to check this project into GitHub with a possibility of making it public in the future, and I didn’t want to check in my passwords (not a good practice either way). ESPHome supports maintaining a separate secrets.yaml and interpolating its values into the main config, so I leveraged that.
Here’s what a typical secrets.yaml looks like for our use case so far:
wifi_ssid: "your-wifi-name"
wifi_password: "your-wifi-password"

ap_fallback_password: "changeme123"
I added a .gitignore to keep credentials and runtime state out of the repo:
# Secrets — never commit
esphome/secrets.yaml

# Runtime state / generated data
homeassistant/config/*

# ESPHome build cache
esphome/.esphome/
Bringing the Stack Up
It’s now finally time to bring up everything. Similar to how the Docker installation was wrapped into an idempotent script, I created one for setting up the rest of the stack as well.
cd home-automation
bash scripts/install-stack.sh
Here is what it does, step by step.
Setup. Same strict mode and helpers as before, plus a die helper that prints an error and exits. The script also moves into the repo root, regardless of where it is called from:
#!/usr/bin/env bash
set -euo pipefail

log()  { printf '\033[1;32m==>\033[0m %s\n' "$1"; }
warn() { printf '\033[1;33m!!\033[0m %s\n' "$1"; }
die()  { printf '\033[1;31mERROR:\033[0m %s\n' "$1" >&2; exit 1; }

SCRIPT_DIR="$(cd "$(dirname "${BASH_SOURCE[0]}")" && pwd)"
REPO_DIR="$(cd "$SCRIPT_DIR/.." && pwd)"
cd "$REPO_DIR"

[[ -f docker-compose.yml ]] || die "docker-compose.yml not found in $REPO_DIR — run this from inside the repo."
Step 1: Sanity checks. Docker must be installed and usable without sudo. This catches a missed log out/in after the previous script:
command -v docker &>/dev/null || die "docker not found. Run scripts/install-docker.sh first."
if ! docker info &>/dev/null; then
  die "docker is installed but not usable by $USER. Did you log out/in after install-docker.sh added you to the docker group? (or run: newgrp docker)"
fi
docker compose version &>/dev/null || die "docker compose plugin not found. Re-run scripts/install-docker.sh."
Step 2: Secrets. On the first run, secrets.yaml is created from the example and the script warns to fill in real values. On later runs the file is left alone. The script does not abort here, so it needs a re-run once the values are in:
if [[ ! -f esphome/secrets.yaml ]]; then
  cp esphome/secrets.yaml.example esphome/secrets.yaml
  warn "Created esphome/secrets.yaml from the example — it has placeholder"
  warn "values. Edit it now with your real Wi-Fi credentials:"
  warn "    \${EDITOR:-nano} $REPO_DIR/esphome/secrets.yaml"
  warn "Re-run this script after editing."
else
  log "esphome/secrets.yaml already present — leaving it as-is."
fi
Step 3: Bring the stack up.
log "Pulling images ..."
docker compose pull

log "Starting the stack (docker compose up -d) ..."
docker compose up -d
Step 4: Install the systemd unit so the stack survives a reboot. I cover this in detail in Surviving a Reboot below.
UNIT_PATH=/etc/systemd/system/home-automation.service
log "Installing systemd unit at $UNIT_PATH ..."
sed "s|__REPO_DIR__|$REPO_DIR|" "$SCRIPT_DIR/home-automation.service.template" \
  | sudo tee "$UNIT_PATH" >/dev/null

sudo systemctl daemon-reload
sudo systemctl enable home-automation.service
log "home-automation.service enabled — the stack will now start automatically on boot."
Step 5: Report status and print the URLs.
log "Current container status:"
docker compose ps

cat <<EOF

Done. Next:
  - Home Assistant:   http://$(hostname -I | awk '{print $1}'):8123
  - ESPHome dashboard: http://$(hostname -I | awk '{print $1}'):6052
  - Check the stack survives a reboot with: sudo reboot   (then re-ssh and run 'docker compose ps')
EOF
Surviving a Reboot
[Unit]
Description=home-automation docker compose stack
Requires=docker.service
After=docker.service network-online.target
Wants=network-online.target

[Service]
Type=oneshot
RemainAfterExit=yes
WorkingDirectory=__REPO_DIR__
ExecStart=/usr/bin/docker compose up -d
ExecStop=/usr/bin/docker compose down
TimeoutStartSec=0

[Install]
WantedBy=multi-user.target
In step 4 above, install-stack.sh uses sed to substitute __REPO_DIR__ with the real clone path and installs the result as /etc/systemd/system/home-automation.service.
sequenceDiagram
    participant Boot as Server boot
    participant D as docker.service
    participant S as home-automation.service
    participant C as Containers

    Boot->>D: start
    Boot->>S: start (after docker + network-online)
    S->>C: docker compose up -d
    C-->>S: homeassistant, esphome running
    Note over S,C: Idempotent — safe even if already up
Verifying
docker compose ps should show you two containers up and running.
CONTAINER ID   IMAGE                                          COMMAND
eab426086c00   ghcr.io/home-assistant/home-assistant:stable   "/init"
e4c6febd2e22   ghcr.io/esphome/esphome                        "/entrypoint.sh dash…"
Then I rebooted the server to confirm the stack comes back on its own:
sudo reboot
docker compose ps
Configuring the Services
Home Assistant Onboarding
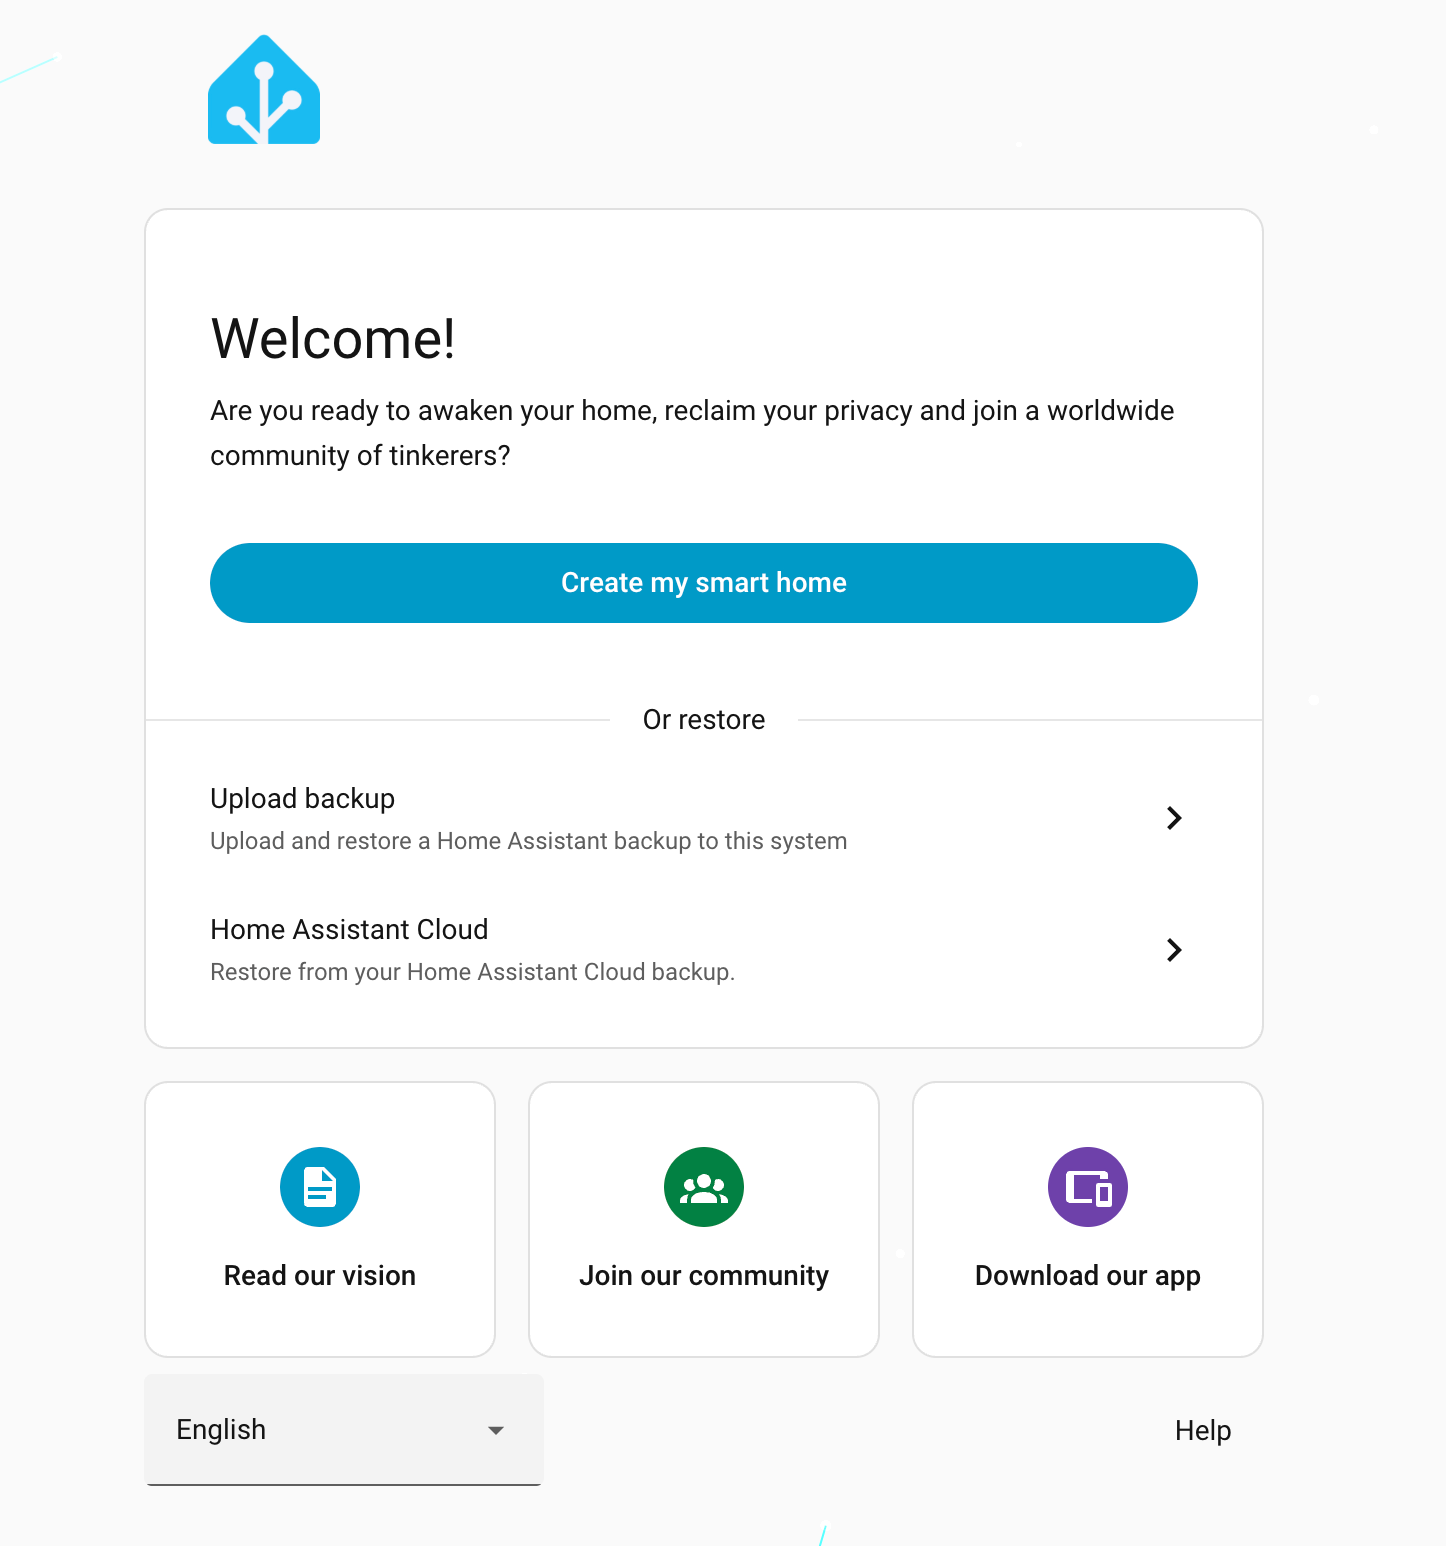
Home Assistant takes you through an onboarding wizard the first time the application is launched. The very first screen is this Welcome page, offering to either set up a fresh instance or restore one from a backup.
I picked Create my smart home and went through the rest of the wizard — creating the first admin account and setting a name and location for the installation — before landing on the empty dashboard.
Moving the ESP32 onto the Home Lab
This is how the entire setup works now. I flashed the ESP32 over a MicroUSB cable the first time; from the second flash onwards, with OTA reflashing enabled, I could reflash it directly through ESPHome.
sequenceDiagram
    actor Me
    participant Dash as ESPHome Dashboard
    participant ESP as ESP32
    participant HA as Home Assistant

    Me->>Dash: Edit overhead-tank-monitor.yaml
    Dash->>Dash: Compile firmware
    Dash->>ESP: Flash (USB first time, OTA after)
    ESP->>ESP: Boot, join WiFi
    ESP-->>HA: Announce over native API
    HA-->>Me: New device discovered
The configuration changes from Part 1 were small. The device is unchanged, but it now has a server to talk to:
api: {}          # native Home Assistant integration

ota:
- platform: esphome # OTA reflashing after the first USB flashlambda: |-
// Full = sensor ~3 in (76 mm) above the water surface; water depth is
// 56 in (1422 mm), so empty = 59 in (1499 mm).
const float SENSOR_TO_EMPTY_MM = 1499.0;
const float SENSOR_TO_FULL_MM = 76.0;Discovering the Device in Home Assistant
When I opened Home Assistant, I saw a notification to add a discovered ESPHome device. Home Assistant seems to do this quite well — I just had to add the device from the notification.
Building a Dashboard
Lastly, I wanted a dashboard to land on whenever I open Home Assistant. Here’s what I did:
- From Settings -> Areas, labels & zones. Created a new area named Terrace.
- Back to Settings -> Devices & services -> ESPHome -> Overhead Tank Water Level. Clicked on Edit on the top right and added the area as Terrace.
- Back to Settings -> Dashboards. Created a new dashboard. Clicked on Add and selected Terrace -> Overhead Tank Water Level -> Tank 1 Water Level -> Gauge type
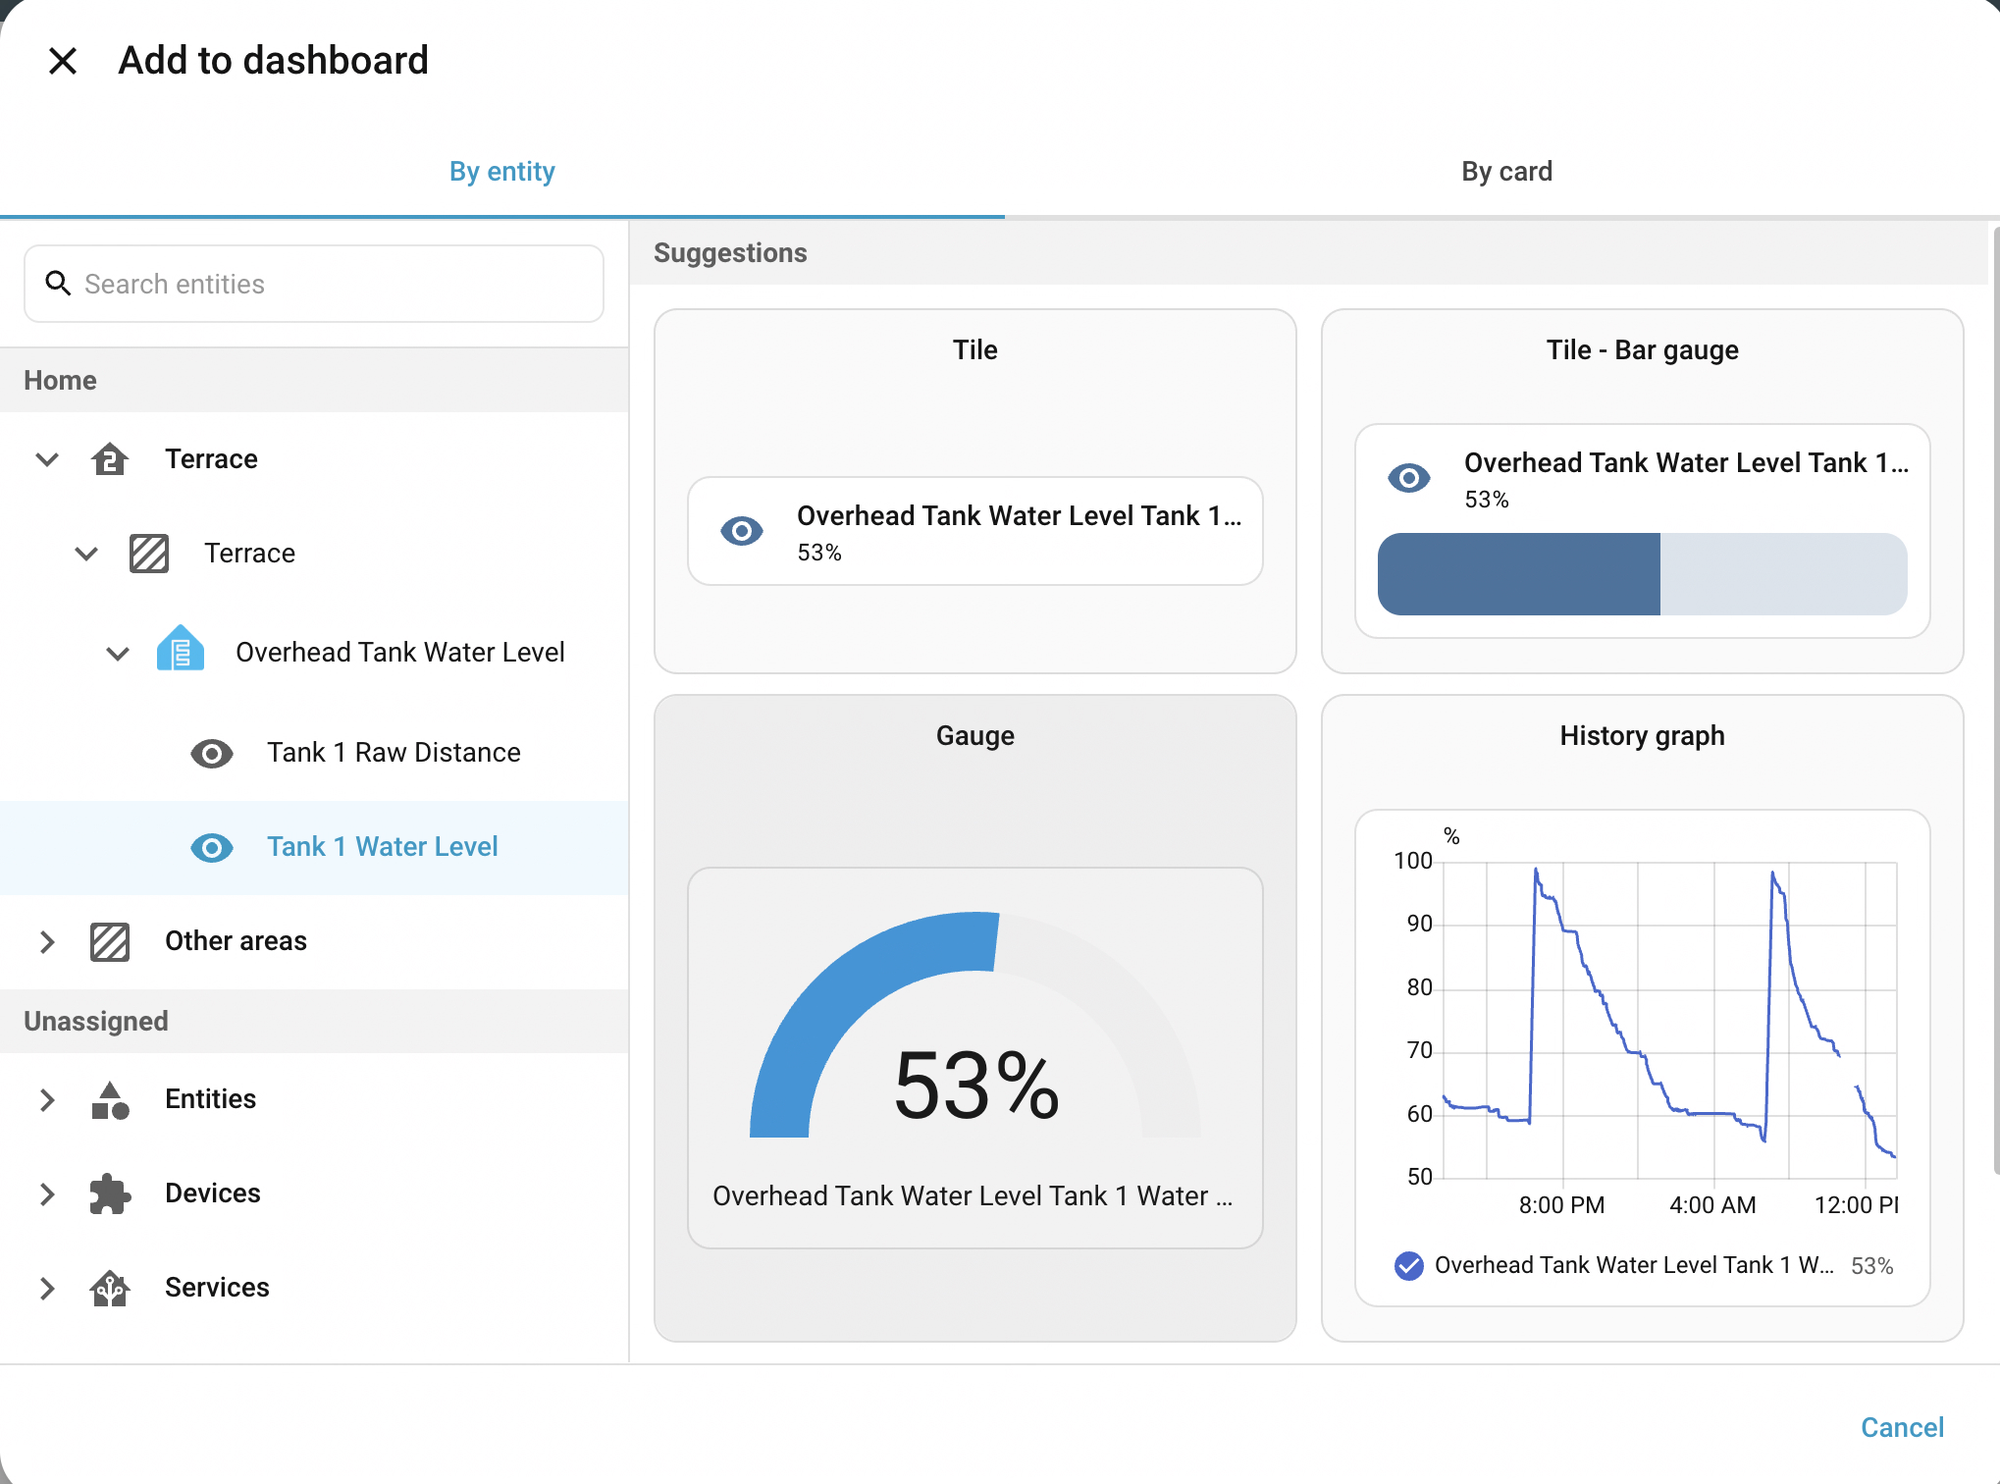
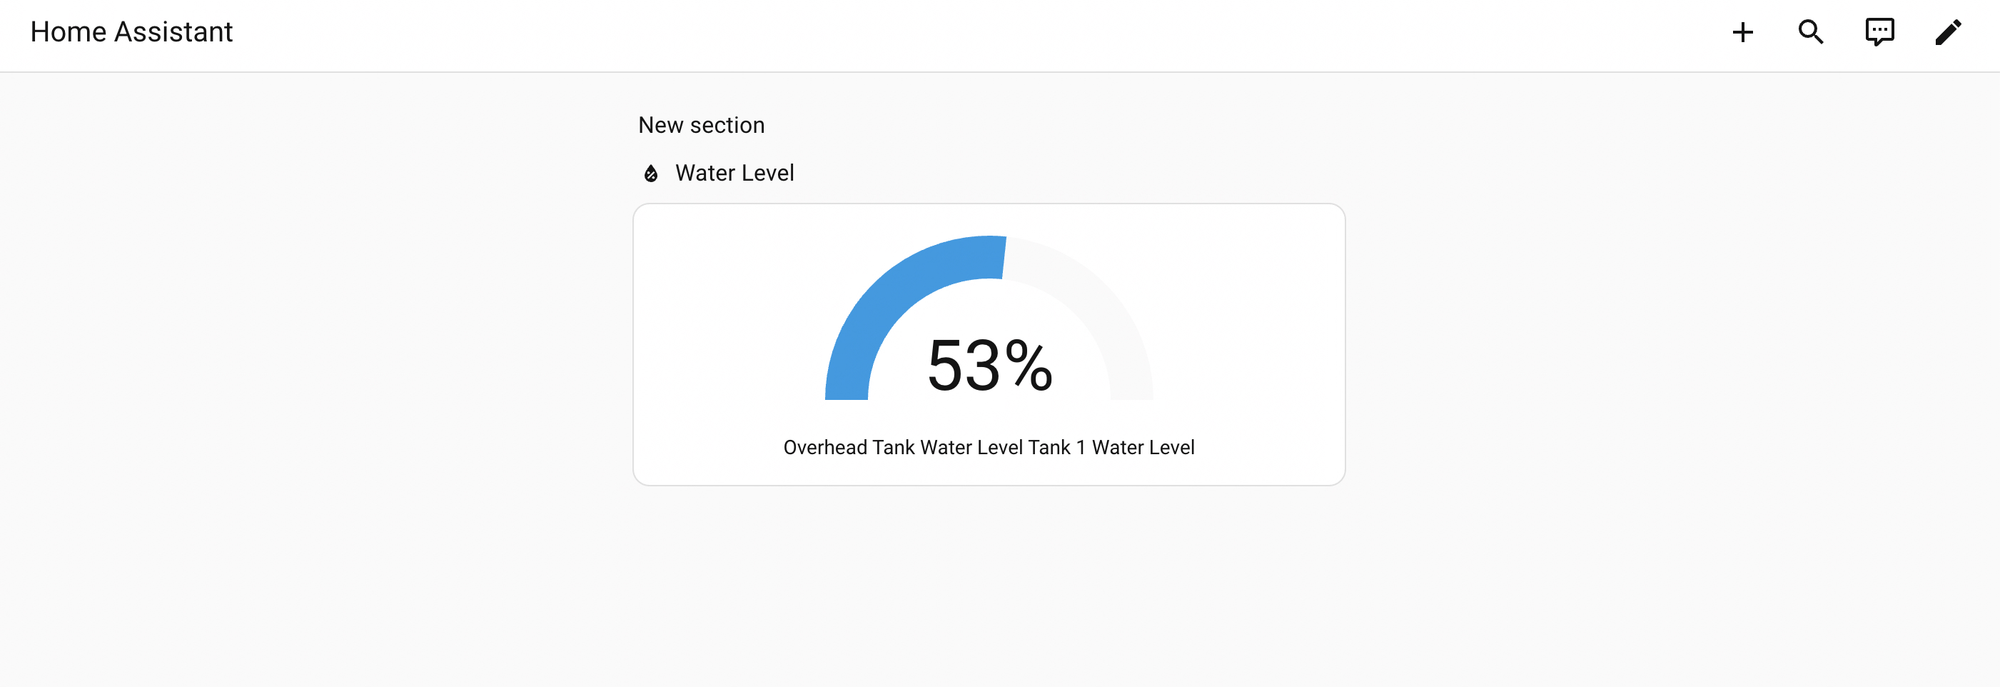
This is the final dashboard:
What’s Next
- Mount the sensor in the real tank and fine-tune the calibration constants.
- Add Tank 2 (second
uart:bus on GPIO4). - Notifications when the level drops too low.
- Control the water motor automatically.